DRIVEWAY HEATING IN TORONTO – NEVER BEEN EASIER

What is a Heated Driveway System?

Heated driveway system is a system of snow melting mats and cables placed under the concrete, asphalt or paving stone in order to prevent the buildup of snow and ice on the driveway, parking garage, ramp, walkway, and stairs. The system is connected to moisture and temperature sensing thermostat which turns the heat on and off automatically. The system will save you money which would otherwise be spent on plow companies, shoveling and also reduces accidents associated with slip and falls on the driveway.

How do heated driveways and roads work?

Heated roads work on the principle that concrete is conductive. When an electric current passes through the concrete, it turns the road into one giant heater element. It only takes forty-eight (48) volts to power the system. The system is switched on before snowstorms start. By so doing, the road surface will already be warm to prevent the accumulation of snow on the road surface. Once the snow hits the surface of the road, it starts to melt immediately.

The concrete used in heated roads costs about $300 per cubic yard whereas regular concrete costs $120 per cubic yard. As a result, the heated slabs are used only in dangerous spots that are prone to freezing.

How much does it cost to put in a heated driveway in Toronto, Canada?

The cost of installing a heated driveway is affected by a number of factors such as the type of system you want, cost of the materials and if you have an existing driveway. For homeowners who have to demolish existing driveways, the cost of installing the heated driveway ranges from $14 to $24 per square foot. With these calculations, a 20 x 50 foot driveway will cost about $15,000 to install. You should note that the water-based systems are more expensive to install but cheaper to operate. Automatic systems are also more expensive than the manually operated ones.

An alternative to the heated systems is the portable heating mats. These can be placed over the driveway to prevent snow accumulation. The cost depends on size. The larger mats cost about $1,000.

How much energy does a heated driveway use?

The cost of operating the snow melting systems depends on the size of the area that is being heated, average total hours of snowfall, utility costs and how fast the user wants the system to melt the snow. Higher voltage will be needed for use in colder climates. On average, it costs between $120 and $250 every winter operate a heated driveway system on a 1,000 square foot driveway. The cost will vary depending on the average kilowatt cost per hour in your local area.

Driveway heating – an affordable solution for your Toronto home

For keeping snow and ice buildup off your property, Heavenly Heat has what we believe to be the best solution — driveway heating. In Toronto and other parts of Canada, the harsh winter conditions make for a constant struggle in keeping parts of your property free of snow. Luckily, Heavenly Heat has a great way to eliminate this problem before it starts, with our unique and effective driveway heating system.

Can you install snow melting system on existing driveway?

Yes. The snow melting systems can be installed on existing driveways with minor construction changes. Radiant heat cables can be placed under the existing driveway. You don’t have to tear up the asphalt or concrete. Alternatively, new material can be poured over the cables. It is also possible to install the heating system for the tires of your car so you don’t have to heat the entire driveway.

Heating Your Toronto Driveway

Waking up with driveways covered in snow and ice is a reality that most Canadians and people who live in areas with snowy conditions have to deal with on a frequent basis. Snow and ice buildup on driveways are a constant nuisance that results in constant shoveling and salting of the driveway, often to mixed success. If left untreated, snow and ice buildup can cause irritating delays such as cars getting stuck in the driveway, to more serious issues like slips and falls from ice buildup. Under certain conditions, snow can quickly turn into ice, and get mixed up with salt — the resulting combination of snow, salt and ice can be very difficult to remove, amounting to hours of hacking and digging; even snow blowers will sometimes find it difficult to get through heavy snow buildup. All of these potential hazards and obstacles caused by snow buildup make it a necessity for homeowners to address this problem. Unfortunately, most solutions to this problem only offer temporary relief since they only treat snow when it builds up; our solution is more effective precisely because it prevents snow from building up in the first place.

Heavenly Heat has a solution that brings constant relief of snow buildup in your driveway over the long winter season — the installation of a driveway heating system. Taking a proactive approach to preventing and removing any snow buildup on our customers’ property, the driveway heating system eliminates the problem before it starts. A heated driveway system will ensure that snow is quickly eliminated when it initially falls on the surface, thus preventing it from accumulating. Since the system works by melting the snow at its core, there will no longer be any need for constant shoveling and salting of driveways in the early mornings or after work. The installation of our system will reduce your workload and thus free up time to do other more important things. Additionally, the system will reduce the need for driveway repairs due to preventing ice and frost damage that is a result of snow buildup wearing down the foundations of the surface. We believe that Heavenly Heat’s driveway heating system is Toronto’s best and most cost effective option when it comes to tackling the constant issue of snow removal. Free yourself from winter worries and contact us today about our driveway heating system — we’ll help you get rid of snow buildup on your driveway for good.

Functionality & Installation

Radiant floor heating circulates through a property in fixed, water-heated pipes or by electrical heating coils set below the flooring. These then help to transfer heat into the interior of the house in an efficient and cost-effective manner. In fact, the heat is transferred through the floor into anything the floor then touches. This is particularly effective if the material touching the floor can conduct heat in an efficient manner – for example, a free standing lamp made out of metal. This just helps radiate the heat even more.

Of course, when building a new house from scratch, radiant floor heating is far easier to install than putting it into an existing home. That said, should you require radiant floor heating in a current home, our team of experts at Heavenly Heat are up to the task. Installation is usually done using our EasyMat or EasyWire system, both perfect for ensuring heat is distributed throughout the house. Remember, most radiant heat systems will have to compete with other critical systems that will are placed under flooring – think plumbing and electrical wiring in this regard. For this reason, getting an expert to install the system is a must.

Characteristics of radiant heat systems

  • Bear the following in mind when installing a radiant heat system:
  • By installing quality parts, you ensure a more efficient heating system: Tankless heaters, hot water heaters or boilers used to heat the radiant heating system should be of the highest quality your budget can afford. This ensures the system runs efficiently and over an extended period without needing to replace anything.
  • Incorporate control areas: Invariably, there are different areas in your house regarding temperature. For instance, a second story room with plenty of sunlight will be warmer than a room on the lower floor with no solar gain. Use these zones in your favor, delivering more heat to an area that needs it, for example, a tiled bathroom floor.
  • Location of thermostats: Place thermostats in areas of the home that are stable in temperature. Never put them near a fireplace, in the kitchen or near direct sunlight. Try to keep them fairly central for each zone that they control.

How Does Heated Driveway System Work?

If you live in Toronto or any other region that experiences extreme winter weather, you may spend many hours shoveling your driveway each winter. Having to shovel more than three times a day might leave you begging for a better solution.

Even if you don’t reside in areas that get heavy snow, if you’re experiencing limited mobility or live in a neighborhood where kids don’t want to earn additional cash, installing a heated driveway system can work. In fact, the system can help you endure the entire winter season with a safe passage to and from your house without ever firing up any snow-blower or using a shovel.

Note that replacing your drives ensures proper installation of the heating system.

Driveway Heating System Installation

Modern homeowners are installing driveway heating systems for two main reasons. First, it helps to prevent slip and fall cases in the driveway during the snow season. Secondly, it prevents the frustration of your car getting stuck in a pile of snow when you park on the driveway.

The installation process is quite straightforward, but we recommend having a contractor to complete it. Proper installation is key for the driveway heating system to perform as it should. Begin with preparing for the actual installation.

Here is how a Heated Driveway System Works

Basically, heated driveways are a radiant floor heating system. It can be installed both indoors and outdoors. When there is a significant drop in temperature, warm water and antifreeze are pumped through the heating system’s tubing. This causes melting of any snow that accumulates in your driveway. With a flip of a switch at the comfort of your home, you can watch all the snow or even ice in your driveway melt away.

Installing a heated driveway doesn’t mean you must create a new driveway. The tubing (for heating) can run under existing driveways too. To decide whether you can install a heating system in your current driveway or you need a new driveway, there are important factors you should consider. These include the soil compaction, time of the year, trees in proximity, and more.

The prepping process will be determined by how your existing driveway looks.

Before laying the cables, your contractor will first determine how far apart they need to be. Once the cables are laid, a remesh is placed to ensure even distribution of heat. If there are cracks on the driveway, cable jumpers will be installed.

A control panel is then placed in an appropriate location and the system is tested to ensure it is functioning well. Once the contractor has confirmed that the system is running well, the asphalt or concrete will be poured to cover it. This will require adequate drying time before you can walk, park or apply any pressure on the driveway.

Driveway heating systems can be placed on many different surfaces. They come in different types some are manually activated whereas others are automatic.

Driveway Heating System
Driveway Heating Mats
Driveway Heating Cables
Full Coverage vs. Tire Tracks
Driveway Heating System

DRIVEWAY HEATING SYSTEM

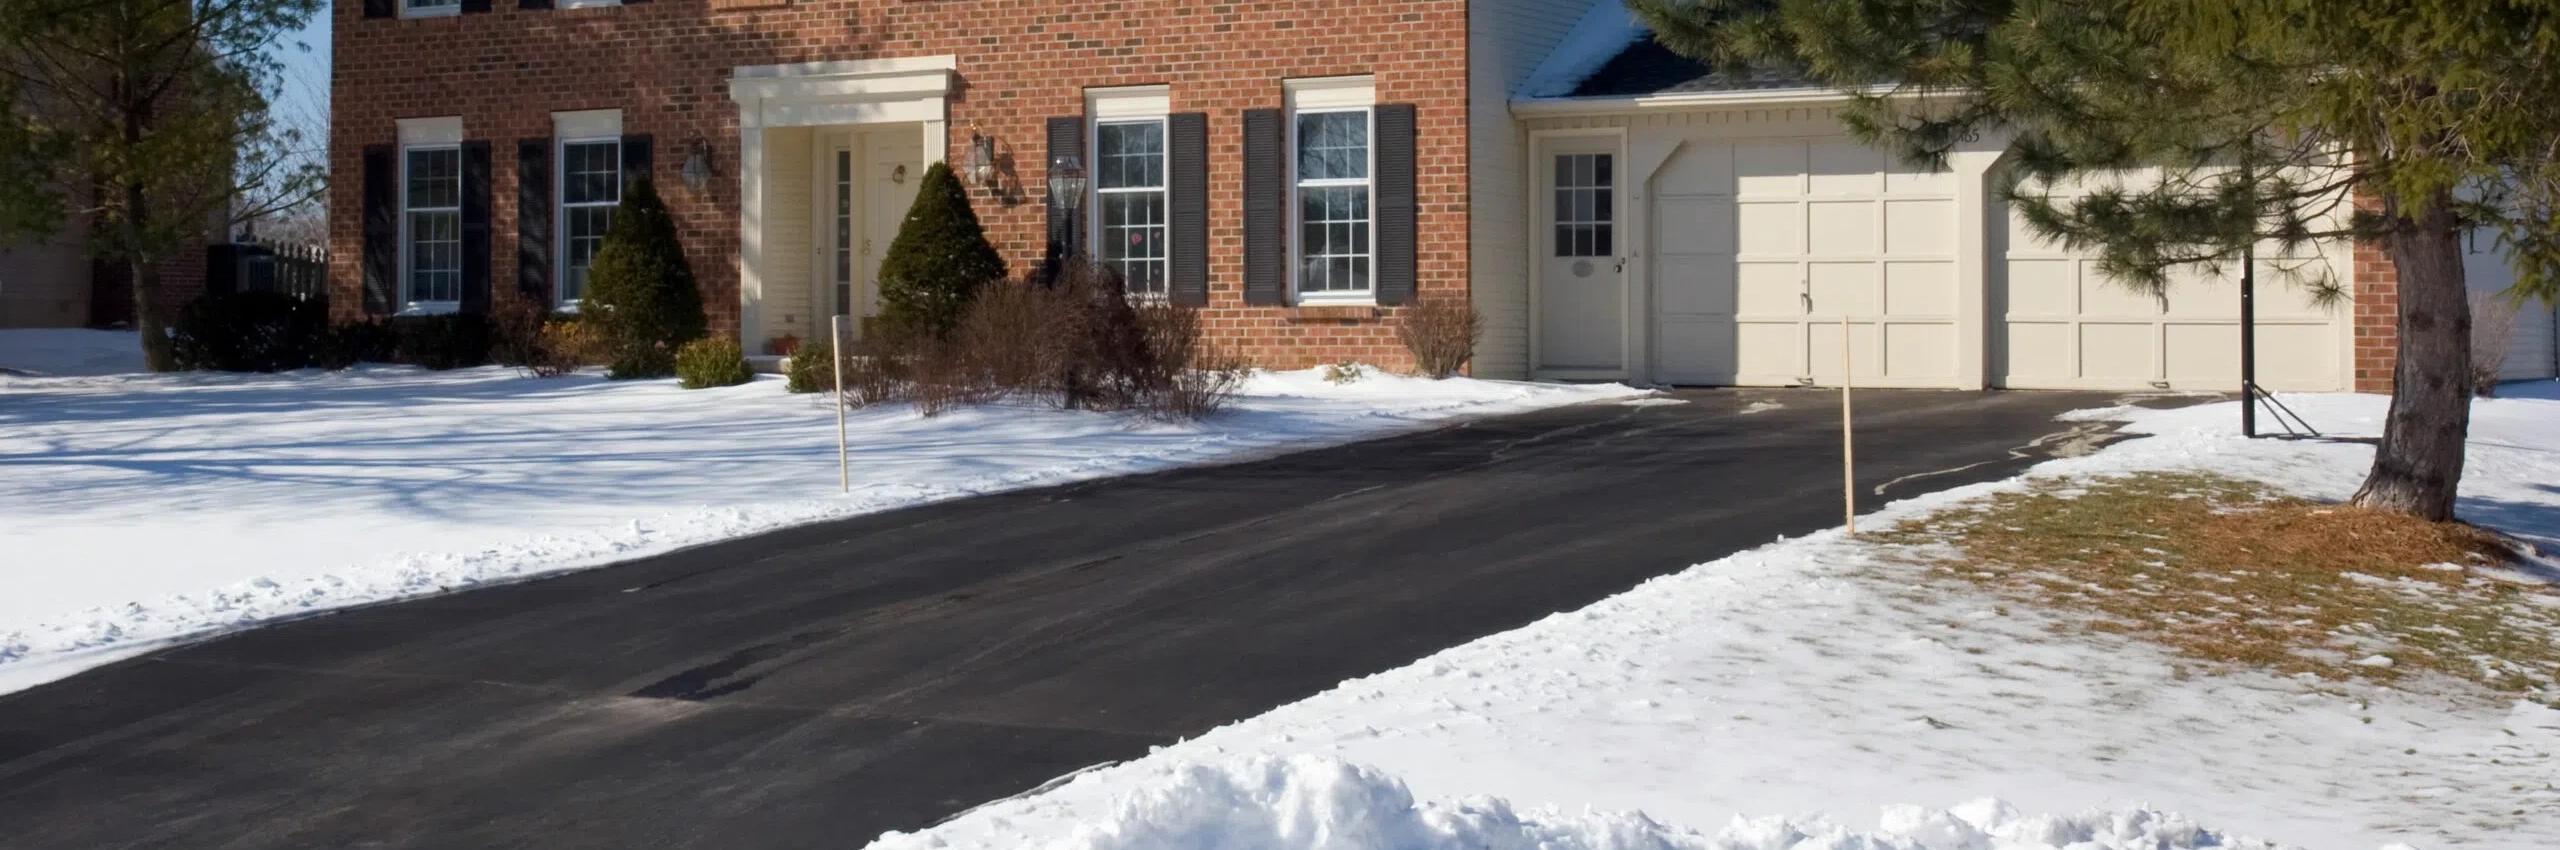
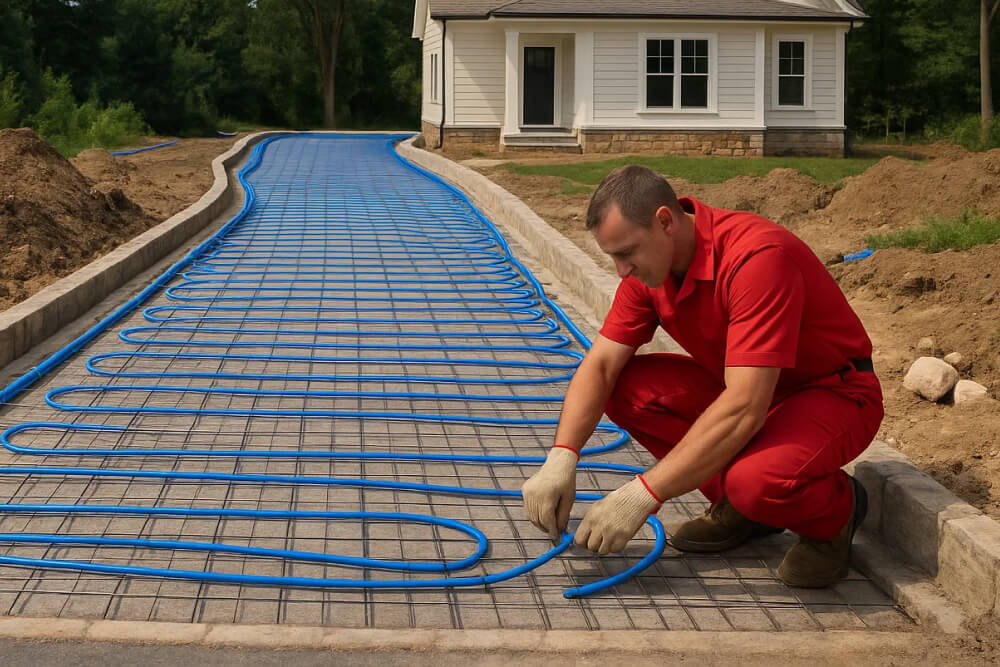
Imagine getting up early every day in those cold winter mornings to deal with the snow and ice build up in your driveway? Would you ever enjoy winter months if shoveling every morning is on your to-do list? Snow melting systems take the stress of dealing with snow and ice accumulation out of the window. They can be installed in any type and size of driveway. The system includes a heating element, which can be either cables or a melting mat and a control. The heating element is embedded directly in concrete, asphalt or under pavers. Driveway heating systems are ideal in homes and commercial environments.

Driveway Heating Mats

Snow melting mats are an ideal solution for regularly shaped driveways. If you have a square or rectangular driveway, a snow-melting mat can help you to effectively deal with snow and ice build up. These mats are designed for even heating and optimal spacing throughout. The main advantage of this system is that it’s very easy to install. Unlike cable, which takes more time to install, a snow-melting mat comes in a wide variety of widths and lengths to ensure it covers your entire driveway. However, the mats are more expensive than heating cables. They are available in 120 or 240 voltages.

Driveway Heating Cables

If you have an unusually shaped driveway, snow-melting cables are a better solution than mats. The cables come in a wide range of sizes and are designed to accommodate even the most irregularly shaped driveway. Most of the snow-melting cables used in residential areas are available in 120 or 240 voltages. If you need this installation for a commercial environment, then 208 and 277 voltages are available for you. Snow melting cables are cheaper than mats but harder to install. The good thing with these systems, which makes them suitable for circular driveways and outdoor stairs, is that they can be installed with different spacing in order to minimize or increase the watts per sq. ft.

Full Coverage vs. Tire Tracks

During heavy snowfall, it’s important that the entire driveway is cleared of snow and ice. A full coverage system is designed to guarantee this but if you are like most property owners, operating costs could be your greatest concern. The good thing is, you can get full-coverage snow melting systems that use zoned heating to minimize the energy demand. The driveway is divided into zones, which are then heated one at a time. This helps to significantly reduce the energy demand and operating costs. Alternatively, you can install tire tracks which reduce the cost of installation as well as energy demand.

Driveway Heating System

A reliable driveway heating system will keep the area useable even in the heaviest of snowfalls. You can find a system that is affordable with reasonable operating costs. You can choose between snow melting cables and mats. With snow melting mats, you get an easy-to-install system that offers even heating throughout the driveway. Snow melting cables require more installation time but they are more affordable than the mats and perfectly suit irregularly shaped driveways. It is important to understand the particular needs of your driveway and choose a heating system that offers top-notch performance. You can then enjoy the convenience and effectiveness of a driveway heating system.

Driveway Heating in Toronto – Heated Driveway Cost

Also known as heated driveways, snow melting systems are a cost-effective alternative to salting, shoveling, snow blowing, snow plowing, and other common snow removal methods. The idea behind such a system is to have a warm surface ready for the snowflakes and melt them away. Here is a comprehensive guide to help handle your snow melting project (in an asphalt driveway).

The estimated cost of a melting snow system (tire tracks)

For a 10’x20’ driveway, the estimated cost of heating a driveway’s tire tracks only is $2,346. You will need at least two snow melting mats ($860), an advanced snow melting control ($670), an aerial snowmelt sensor ($580), a relay panel small ($360), and a snowmelt plaque ($38).

Why install a snow melting system?

While snow can be beautiful, it’s associated with inconveniences and a higher level of danger. For instance, if you need to be somewhere like your workplace or have an important meeting to attend, snow-filled driveways or walkways can be a huge inconvenience. A functional snow melting systems can keep driveways, sidewalks, parking areas, stairs, and other surfaces free from snow.

Plan

Planning is an important step when it comes to the installation of a heated driveway. It helps to estimate the snow melting system cost and the required timeline for effective projection completion. A good plan will also help you determine all the necessary resources, compare them with your estimated budget, and make the right choices.

System installation: Full coverage vs. tire tracks

One common alternative to a snow melting system that covers an entire drive is to heat the tire tracks only. It’s a cost-effective way of reducing the installation and operating costs associated with heated driveways.

Snow melting in asphalt

The construction of an excellent asphalt driveway requires several layers. For the purpose of illustrating the estimated cost of driveway heating, assume that one layer includes 5/16″ thick snow melting mats. Here are the steps to follow.

  • Excavate and ensure the ground is compact: For residential applications, the layer of compacted gravel should be 4″ to 8″ deep or even 12″ for surfaces associated with high traffic.
  • Prepare the junction box: A junction box acts as an intermediary between the snow melting relay panel and the heating element. Establish the junction box before you start the installation of the heating system. This ensures all other steps follow your set plan.
  • Create an asphalt base coat layer which is 1.5″ to 2″ deep.
  • Lay out the snow melting mats
  • Use an ohmmeter to test your system at each stage of installation to be sure that the heating element is functional.
  • Spread asphalt over the finished melting mats, creating a 2″ to 3″ deep layer. Avoid mechanized asphalt pavers as they can interfere with the heating element.

Note that the junction box, temperature sensor, and controls for your snow melting system must be installed carefully. If you’re not sure of how to install a heated driveway, it’s advisable to get it done by a licensed electrician.

  • Easy Mat
  • Easy Wire
  • Thermostat
Floor Heating 130 SQ FT System Easy Mat Underfloor Easy Installation 120 V or 240 V
Floor Heating 100 SQ FT System Easy Mat Underfloor Easy Installation 120 V or 240 V
Floor Heating 10 SQ FT System Easy Mat Underfloor Easy Installation 120 V or 240 V
Floor Heating 50 SQ FT System Easy Mat Underfloor Easy Installation 240V
Floor Heating 20 SQ FT System Easy Mat Underfloor Easy Installation 240V
Easy Wire
Floor Heating 140-165-186 SQ FT240V System Easy Wire Underfloor Heating Cable, Floor Sensor, Plastic Cable Clips
Floor Heating 9-10-11 SQ FT120V System Easy Wire Underfloor Heating Cable, Floor Sensor, Plastic Cable Clips
Floor Heating 16-20-23 SQ FT240V System Easy Wire Underfloor Heating Cable, Floor Sensor, Plastic Cable Clips
Floor Heating 24-30-32 SQ FT240V System Easy Wire Underfloor Heating Cable, Floor Sensor, Plastic Cable Clips
Floor Heating 30-35-40 SQ FT120V System Easy Wire Underfloor Heating Cable, Floor Sensor, Plastic Cable Clips
Floor Heating 40-45-53 SQ FT240V System Easy Wire Underfloor Heating Cable, Floor Sensor, Plastic Cable Clips
Honeywell TH115-AF/TH115-GB

Learning Center

How to Find a Broken Wire in a Heated Floor

Just like other floor heating systems Toronto, your radiant floor heating system may develop some problems. The most common problem is a broken wire….

Will Installing Floor Heating Help To Save Me Money On My Energy Bills?

The benefits of radiant heating, ranging from silent functionality to energy efficiency, remain undisputed. So, do heated floors save money? Installing underfloor heating to…

Busting Myths On Floor Heating Systems

Costs For Radiant Floor Heating In A Calgary Bathroom

Alberta’s largest city, Calgary, has so much to it. Not only is this cosmopolitan city the center of Canada’s oil industry, but it is…

0